Ubuntu Ssh Permission Denied Please Try Again
Introduction
The SSH Permission denied fault appears afterwards permission-related settings are modified on the SSH server. Usual scenarios include a new packet installation or the creation of new users.
In this tutorial, you will learn how to troubleshoot the SSH Permission denied error and reconnect to your SSH server.
Prerequisites
- SSH client on the local auto and SSH server on the remote organization
- A user account to access the remote server (for password-based login)
- A user account withsudo orrootprivileges
What is Causing SSH Permission Denied (publickey,gssapi-keyex,gssapi-with-mic)?
The SSH Permission denied fault appears when trying to SSH into a server:
Permission denied (publickey,gssapi-keyex,gssapi-with-mic) 
Post-obit the Permission denied statement, the bracket contains the attempted hallmark methods that failed at the initiation of the connexion. The error suggests that the public central is the issue, which is misleading.
1 reason for the fault may be sshd_config , the file that contains SSH server configuration. The other possibility is that the authorized_keys file has bereft permissions. This file contains the list of public keys for the clients allowed to SSH into the server. Consequently, the arrangement'southward inability to read from the file results in the Permission denied error.
How to ready SSH Permission denied
Both solutions incorporate steps you lot demand to perform on the server-side. Start by opening the concluding on your server and proceed with ane of the solutions below.
Solution 1: Enable Password Authentication
If you want to use a countersign to access the SSH server, a solution for fixing the Permission denied error is to enable countersign login in the sshd_config file.
To do this, open the file in a text editor. This example uses the nano editor:
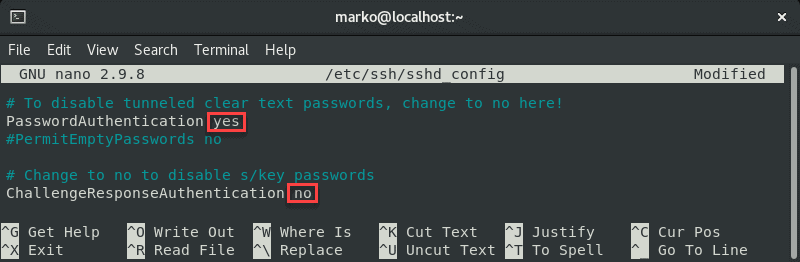
sudo nano /etc/ssh/sshd_config In the file, find the PasswordAuthentication line and brand certain it ends with yes .
Find the ChallengeResponseAuthentication choice and disable it by adding no .
If lines are commented out, remove the hash sign # to uncomment them.
Save the file and exit.
Restart the SSH service by typing the post-obit control:
sudo systemctl restart sshd Solution 2: Change File System Permissions
Using the countersign-based login equally the SSH authentication method is not recommended due to security concerns. Therefore, the following solution may be preferable since it troubleshoots the public key authentication method.
First, open the sshd_config file using a text editor:
sudo nano /etc/ssh/sshd_config In the file, make sure the post-obit options are set every bit follows:
PermitRootLogin no PubkeyAuthentication aye 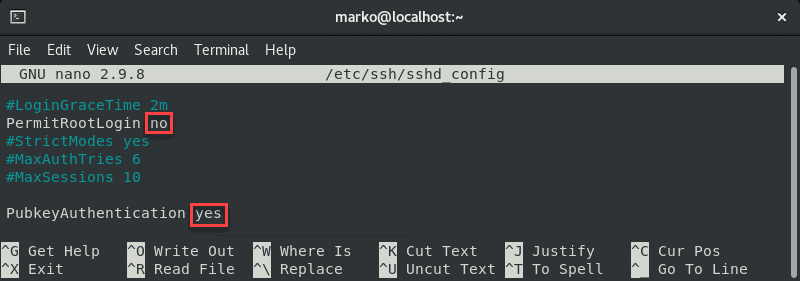
Note: The steps higher up are considered all-time security practices. If you need to utilise root login, fix the relevant line to yeah .
Comment out the GSSAPI-related options by calculation the hash sign at the beginning of the line:
#GSSAPIAuthentication yes #GSSAPICleanupCredentials no 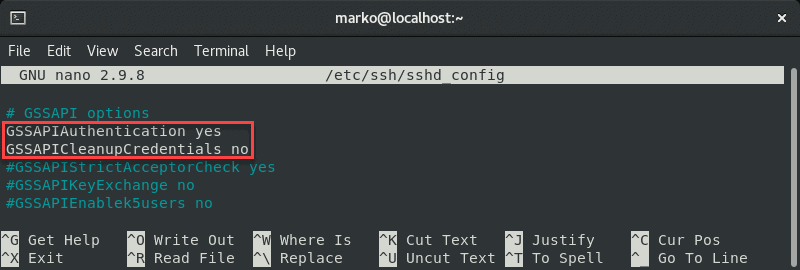
Also, brand sure the UsePAM line is gear up to yes :
UsePAM yes 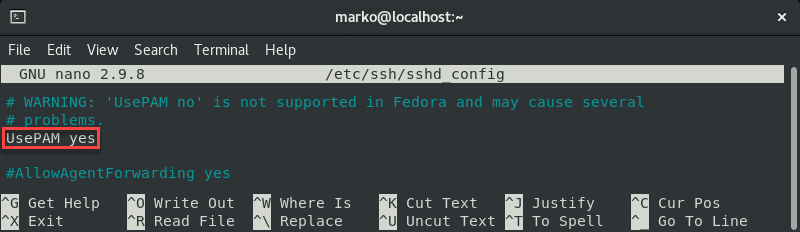
Relieve the file and restart the sshd service:
systemctl restart sshd Now navigate to your home folder and check the permissions:
ls -ld 
If your possessor permissions are not ready to read, write, and execute ( drwx------ ), use the chmod control to modify them:
chmod 0700 /home/[your-username] At present go to the .ssh folder and recheck the permissions:
ls -ld 
This directory should besides have read, write, and execute permissions for the file owner. To enforce them, apply chmod again:
chmod 0700 /domicile/your_home/.ssh The .ssh binder contains the authorized_keys file. Cheque its permissions with:
ls -ld authorized_keys 
The file owner should have read and write permissions. To set them, use:
chmod 0600 /home/[username]/.ssh/authorized_keys At present try logging in with the cardinal pair over again. The output below shows a successful login attempt.

Conclusion
This tutorial covered the steps necessary to troubleshoot the SSH Permission denied (publickey,gssapi-keyex,gssapi-with-mic) error. Past completing the steps in the guide, you should fix the error and successfully SSH into your server.
Was this commodity helpful?
Yes No
blackwoodfelf1976.blogspot.com
Source: https://phoenixnap.com/kb/ssh-permission-denied-publickey
0 Response to "Ubuntu Ssh Permission Denied Please Try Again"
Post a Comment